
As you use your Mac, you may find yourself needing to capture images of what’s displayed on the screen. Whether it’s an error message you want to send to tech support or a picture you want to share on social media, screenshots are a handy tool built right into macOS. In this beginner’s guide, I’ll walk you through how to take a screenshot on mac and crop. We’ll cover the keyboard shortcuts to snap full-screen and selected portion shots, how to find your screenshots after you take them, and how to edit and annotate images using the built-in preview and markup tools. I’ll also share some tips for taking better quality screenshots.
So grab your Mac, and let’s get started capturing!
How To Take A Full Screen Screenshot on a Mac
Taking a full screen screenshot on your Mac only takes a couple of keystrokes. Here are the three main ways to snap a pic of everything visible on your display:
Use Keyboard Shortcuts
The fastest way to take a full screenshot is by using these keyboard shortcuts:
- Command-Shift-3: Snaps a screenshot of your entire screen and saves it as a .png file on your desktop.
- Command-Shift-4 then Spacebar: Takes a screenshot of an entire window and saves it as a .png file on your desktop. After pressing the first two keys, hover your cursor over the window you want to capture and hit the spacebar.
- Command-Control-Shift-3: Works just like Command-Shift-3 but saves the screenshot to your clipboard instead of as a file.
Use Grab Utility
All Macs come with a built-in screenshot tool called Grab. To access it:
- Open Finder
- Go to Applications -> Utilities folder
- Double click on Grab to open it
- At the top, click the camera icon to take a screenshot of your full screen
- By default, it will save the image to your desktop as a .png file
The advantage of Grab is that it gives you a preview of the screenshot, and you can choose where to save the file before capturing. However, the keyboard shortcuts do let you work faster.
Use Screenshot Tool in Menu Bar
If you’ve updated to macOS Mojave or later, there’s a handy screenshot tool icon in the menu bar at the top right of your screen.
To use it:
- Click the screenshot icon
- Select “Capture Entire Screen”
- A thumbnail preview will appear in the bottom right corner
- Click the thumbnail and select a save location from the sidebar menu
This is great because you can immediately open and edit the screenshot without having to find the file on your desktop.
How To Take a Selected Portion Screenshot
In addition to full monitor screenshots, you can also take snapshots of just a portion of your screen. Here are your options for that:
Select Area with Mouse
To select a specific area to screenshot:
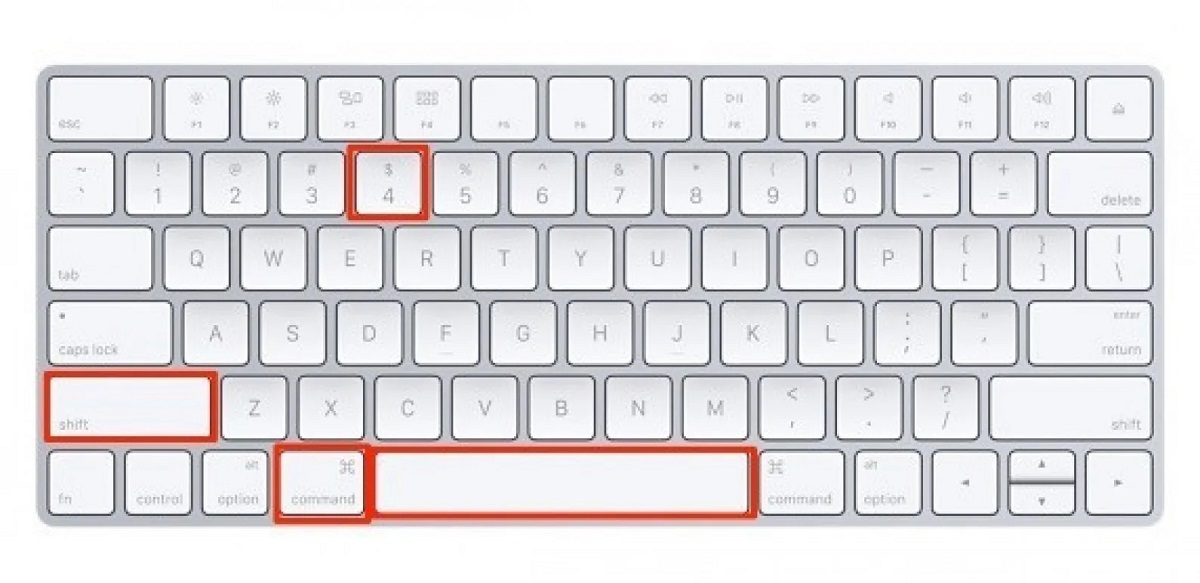
- Press Command-Shift-4
- Move the crosshair cursor to choose the starting corner of the area you want
- Click and drag to highlight the portion to capture
- Release the mouse to take the screenshot after selecting the area
A .png file will automatically save to your desktop. This method allows you to be very precise with selecting the area of focus.

Use Grab Utility
You can also take screenshots of a selected portion of your screen with the Grab app:
- Open Grab
- At the top, click the Selection button next to the camera icon
- Your cursor will change to a crosshair
- Click and drag on the area you want to capture
- Grab will take the screenshot and open a preview
- Choose a save location and click Save
Doing it this way lets you get a preview of the portion screenshot before saving it.
Read also, Why You Should Invest from Your Smartphone
Where Screenshots Are Saved on a Mac
Now that you’re a master at taking screenshots on your Mac using the various methods, you may be wondering where they are saved. Here’s where to find your screenshot files:
Desktop
By default, screenshots taken with keyboard shortcuts (Command-Shift-3, Command-Shift-4) or Grab will save to your desktop as a .png file. The name of the file will be “Screenshot [date] at [time].”
So if you take multiple screenshots, you’ll see the separate files on your desktop, each labeled with the date and time captured.
Clipboard
If you use the Command-Control-Shift-3 shortcut, it will save the full screen image to your clipboard instead of saving a file. You can then paste the image into a document or editing app.
The clipboard memory is temporary, so if you take another screenshot, the previous one there will be replaced. Make sure to paste clipboard screenshots where you want to use them.
Screenshot Preview
On systems running macOS Mojave or later, when you use the screenshot tool from the menu bar, it will open up a thumbnail preview in the bottom right corner rather than saving a file automatically.
You can click that preview image to edit or share the screenshot immediately. This is handy for quick edits or posting to social media, but can clutter your desktop over time as shots accumulate. Make sure to save the images you want to keep.
How To Crop a Screenshot on Mac
After taking screenshots, you may want to crop them to focus on the key area rather than having excess background details. Here are a couple ways to easily crop images on a Mac.
Use Preview App
All Macs come with Preview app installed. After taking a screenshot, you can follow these steps to open and crop it with Preview:
- Open the screenshot file from your desktop
- Click the Tools button at the top
- Select Show Markup Toolbar from the dropdown menu
- Click the Crop icon in the toolbar
- Adjust the crop area corners on your image
- Click Done to apply the crop
- Choose File -> Export to save your changes
Preview also has a host of other markup tools you can use to annotate and edit screenshots.
Use Grab App
The Grab app we used earlier to take screenshots also has editing capabilities:
- After taking a screenshot with Grab, click the Edit button at the bottom of the preview screen instead of Save
- Click Select Area and use the cursor to choose the crop area on your image
- Adjust the crop box size as needed
- At the bottom, click Apply to crop and Save to export the edited screenshot
Grab provides additional filters and tools to perfect your screenshots too.
Keyboard Shortcut
If you have an image open in Preview already, you can use this handy shortcut to quickly crop:
- With the image open in Preview, press Command + K
- Adjust the crop area corners as needed
- Press Return or Enter to complete the crop
It doesn’t get much simpler than that!
Pro Tips for Better Quality Mac Screenshots
Now that you know all the ins and outs of grabbing screenshots on your Mac, here are some pro tips for taking better shots:
- Clear your desktop first. Having lots of icons and open windows on your desktop during screenshots leads to clutter. Close unneeded windows and files for clean background.
- Hide interface elements. Menu bars, dock, notifications and other interface elements on your Mac can distract from the content in screenshots. Hide them for clearer images.
- Dim unrelated areas. If you have important elements on different parts of the screen, consider dimming unrelated sections so the focus area stands out better in screenshots.
- Highlight required areas. Similarly, you can use markup tools in Grab or Preview to add shapes, arrows or text boxes to call attention to important parts of your screenshots.
- Resize before sharing. Screenshots taken as full size images have massive file sizes. Crop and resize to smaller dimensions before emailing or sharing online when possible.
- Expand snippets over time. Start by grabbing smaller selected portions showing only the critical component you need help with or want to share. You can always take more to expand on the situation.
Keep these tips in mind to start taking clearer, more useful screenshots today!
Key Questions
How do I capture an image of a drop-down menu?
Great question! To screenshot a menu selection or submenu, press Command-Shift-4 then Spacebar to capture the open menu. Click the menu to image, then crop as needed after.
Can I capture full webpage screenshots?
Yes, press Command-Shift-4 then Spacebar with the browser page open. It will screenshot the full length of the web page, which you can then crop down if needed.
Is there a way to screenshot on Mac without the mouse pointer showing up?
When using keyboard shortcuts like Command-Shift-3, hold the Shift key while taking the screenshot. This will hide the pointer arrow for a clean image minus the mouse cursor.
Where do screenshots taken with the menu bar icon tool save?
The screenshot icon in the menu bar on newer Macs inserts a screenshot thumbnail preview in the bottom right of screen. Click it quickly and save the image where needed before taking more shots.
Can I delete screenshots automatically after a set time?
There isn’t a built-in setting for that, but you can download an automation tool like CleanShotX. It lets you customize rules for deleting old screenshots after chosen time limits automatically.
Conclusion
We covered how to take a screenshot on mac and crop using handy keyboard shortcuts, built-in tools like Grab, and the screenshot icon in the menu bar. You also know how to find screenshots on your desktop or clipboard and crop images with Preview or Grab too.
Remember those pro tips for taking clean, focused screenshots. Hiding interface elements, dimming unrelated areas, highlighting key sections with shapes, and expanding snippets over time will lead to great images worth saving and sharing.
With practice, taking screenshots will feel quick and intuitive on a Mac. Refer to this guide anytime you need a refresher. And have fun documenting your work and play activities with these newfound skills! The possibilities are endless when you master screenshotting.


