Facebook is one of the largest social media platforms in the world. With over 2.5 billion active users, it is difficult to imagine a world where people don’t have a Facebook profile.
However, privacy is always an option and there are times when you want to make your profile private. In this blog, we’ll tell you everything you need to know about privacy on Facebook as well as tips and tricks to help you keep your profile secure. Let’s get into it!
Why Make Your Facebook Account Private?
Having a private account on Facebook is a great way to limit the activity and profile information that others can view. This can help protect your privacy and prevent people from easily finding you via your email or other profile information.
You can use the ‘Friends’ and ‘Only Me’ privacy options to customize who can see your friend list and status updates. If you don’t want certain people to be able to view your posts, you can make them private. This will limit the personal information of posts to only those people who have access to it. By keeping your account private, you can ensure personal information remains private and secure on Facebook.
How to Make Your Friends List Private
With the popularity of social media sites, privacy has become a major concern for many users. One way to secure your Facebook profile is to make your friends list private. You can adjust your settings to make your friends list private by navigating to the ‘Settings and Privacy’ screen, selecting ‘Edit’ next to ‘Who can see your friends list,’ and selecting either ‘Friends’ or ‘Only Me.’
In this way, only the people you have chosen to view your profile can see your friends list. You can also customize who can see your friends list by choosing ‘Specific Friends’ or ‘Friends Except.’ Watch the video above to learn how to make your friends list private.
To make a single photo private, all you need to do is open the photo and adjust its privacy settings. This will ensure that no one other than you can view it. When posting on Facebook, use the audience selector to choose who can view it and adjust the privacy settings accordingly.
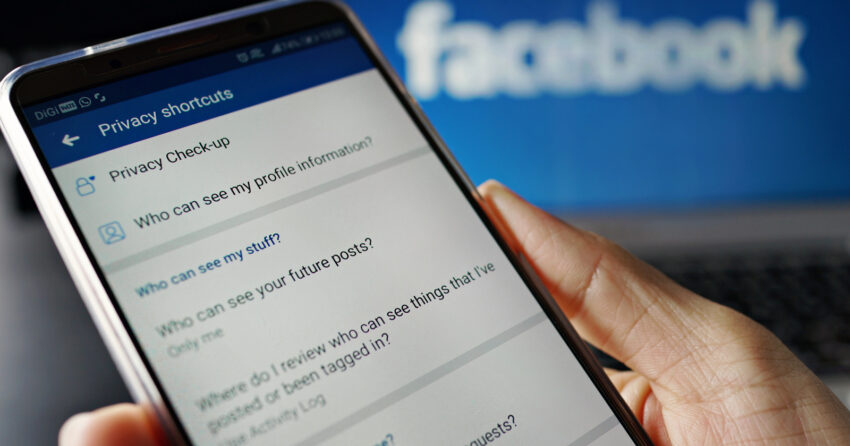
How to Review Your Profile Privacy Settings
It’s important to review your privacy settings on social media platforms to ensure that the information you share is private and secure. One way to do this is to toggle off specific information in your profile, such as your education and hometown in the ‘About’ section of a social media platform.
You can also choose who can view posts you make on your desktop by accessing the ‘Privacy’ tab of your profile page. From here, you can select the audience for posts made on desktops, such as friends, followers, and everyone. Use the audience selector when posting photos or text to determine who can view the post.
After a post is created, you can adjust privacy settings by clicking the audience selector. This will open the ‘Privacy Settings’ tab of the post’s profile page where you can choose whether or not viewers can view the post. Additionally, you can adjust privacy settings by selecting ‘Public’ or ‘Only Me’ from within a post’s menu on the desktop.
How to Use Inline Audience Selector
Use the In-line Audience Selector to adjust the privacy setting for each post. To reconfigure the posted privacy, click on the audience selector displayed with the post and modify the setting. When posting, the drop-down menu called an audience selector lets you control who can view the post. On a desktop, go to settings & privacy, select the Privacy tab, scroll down and find ‘Who can see your future posts?’ and click ‘Edit’ to change the post visibility. There is an option to choose exactly which friends can see the post. This option makes it easy to share content with specific people without sharing it with everyone. Using the In-line Audience Selector not only provides more privacy options but also helps you share content with specific people without sharing with others.
Change Privacy Settings on Photo Albums
You can change the privacy settings of your photo albums on Facebook so they aren’t publicly visible. To do this, open the album you want to remove from public viewing and click the icon resembling the planet Earth below the album’s name. This will open the privacy settings page for that album, where you can choose to make it visible only to friends or as public as the album is.
In addition, you can also change your privacy settings for your profile and cover photos in the “Private posts” options. Changing this setting will ensure that any posts made with those photos are private, regardless of the setting for your profile or album photos. It’s important to regularly check your profile in “View As” mode to ensure you’re not accidentally sharing photos or information with people outside of the platform.
Conclusion
Personal privacy settings are essential to maintaining a private social media profile. They allow users to determine who can view their profile, posts, and friend recommendations. Users can also control the information others can see about them by changing their profile picture, gender, and work title. Furthermore, Facebook allows users to create a unique @facebook email address that only friends and family can use to contact them through the app. This way the user is able to ensure that someone else cannot send them notifications or friend requests without explicitly opting into the request first. It is important for everyone using Facebook to adjust privacy settings according to their individual requirements as no two social media profiles are the same. Comment below if we have missed any other tips for securing your Facebook profile!


