Imagine going on a well-deserved vacation, only to return to drooping and dehydrated plants. It’s a familiar scenario for many plant enthusiasts. The good news is that with a bit of creativity and resourcefulness, you can keep your plants thriving even in your absence. In this guide, we’ll explore six practical and inventive techniques on how to water plants while away.
Technique One: Glass Bottle Solution
Glass bottles can be repurposed into a simple yet effective watering system. Here’s how:
- Choose Your Bottles Wisely: Select glass bottles based on the size of your plants. Larger plants may require bigger bottles, while smaller ones can do well with standard-sized bottles.
- Puncture the Cap: Use a nail and hammer to puncture a small hole in the cap of the glass bottle. This will regulate the water flow.
- Fill and Invert: Fill the bottle with water, put the cap back on, and invert it into the soil. The water will gradually seep through the hole, keeping the soil consistently moist.
Technique Two: Houseplant Bath
Give your houseplants a relaxing bath with this method:
- Choose a Bathtub or Basin: Select a large bathtub or basin that can accommodate multiple potted plants.
- Fill with Water: Fill the bathtub or basin with a few inches of water.
- Group Your Plants: Place your potted plants in the water-filled bathtub. The soil will absorb water through the drainage holes at the bottom of the pots.
- Time It Right: Ensure you water your plants using this method a day or two before you leave, as it provides a reservoir of water for your plants.
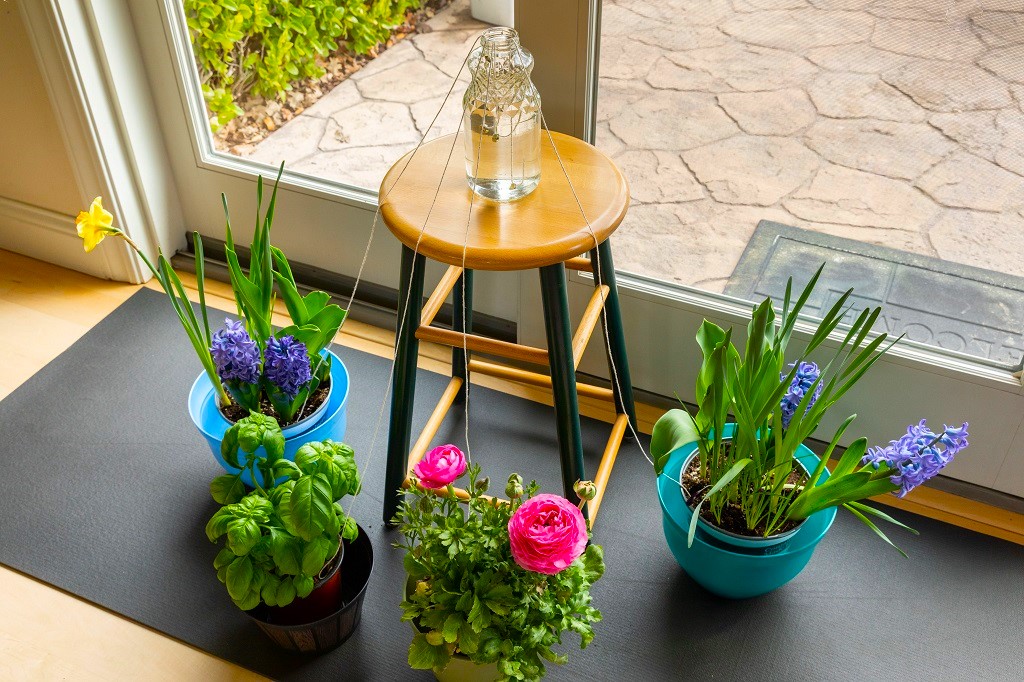
Technique Three: Water-Wicking Drip System
Create a simple and efficient water-wicking drip system with household items:
- Gather Materials: You’ll need cotton strings or fabric strips, a container of water, and a stable support for the water container.
- Insert Wicks: Place one end of the cotton strings into the soil of each potted plant, making sure they reach the roots.
- Suspend the Water Container: Hang or position the water container above the plants. Ensure the strings are immersed in the water.
- Capillary Action: The cotton strings act as wicks, drawing water from the container to the soil through capillary action, keeping your plants hydrated.
Technique Four: Plant Saucer Setup
Utilize plant saucers to create a self-watering setup:
- Select Saucers: Choose saucers that match the size of your pots and are deep enough to hold a sufficient amount of water.
- Fill Saucers: Fill each saucer with water.
- Place Pots: Position your potted plants on top of the saucers, ensuring the pot’s base is in contact with the water in the saucer.
- Absorption Process: The soil will absorb water from the saucer as needed, maintaining a consistent level of moisture.
Technique Five: Tiny Plastic Bag Greenhouse
For small plants, create a miniature greenhouse with plastic bags:
- Prepare Plastic Bags: Cut small, clear plastic bags in half.
- Encase Plants: Place each plant inside a plastic bag, securing the opening around the pot.
- Watering: Before leaving, water the plants thoroughly. The sealed plastic bags will create a greenhouse effect, trapping moisture.
- Place in Indirect Light: Position the plants in an area with indirect light to create a mini-ecosystem.
Technique Six: Plastic Water Bottle Planter
Repurpose plastic water bottles into self-watering planters:
- Prepare Bottles: Puncture holes in the cap of plastic water bottles using a nail and hammer.
- Fill with Soil: Cut the bottom part of the bottle and fill it with soil. Plant your chosen greenery.
- Watering Mechanism: Invert the cut bottle back into the remaining portion, creating a self-watering system. The soil will draw water as needed.
Materials and Tools Needed:
- Plastic water bottles (size varies due to plant size)
- Nails
- Hammer
Procedure 1: Puncture holes in the bottle.
Puncturing holes in a bottle is a simple yet crucial step for various DIY projects, especially when repurposing plastic bottles for plant care or other creative endeavours. This step involves creating openings in the bottle, allowing for controlled water flow, drainage, or specific functionalities depending on the intended use. Here’s a guide on how to puncture holes in a bottle:
Materials Needed:
- Plastic water bottle (size varies based on the project)
- Nail
- Hammer
- Protective surface (optional).
Maintaining the well-being of your plants when you’re away can be a concern for plant enthusiasts. Fortunately, there are several innovative and practical methods to ensure your green companions stay hydrated in your absence. Explore these effective strategies to keep your plants flourishing, even when you’re not there to water them.
Step-by-Step Process:
1: Gather Materials Ensure you have all the necessary materials ready. This includes a plastic water bottle, a nail with a sharp point, and a hammer. If you’re working on a delicate surface, consider placing a protective layer underneath to prevent damage.
2: Select the Right Bottle Choose a plastic water bottle suitable for your project. The size of the bottle may vary depending on the specific use, so select one that aligns with the intended purpose.
3: Identify Hole Placement Determine where you need the holes in the bottle. This varies based on the project requirements. For example:
- If using the bottle for plant watering, puncture holes near the cap for controlled dripping.
- For a plastic bottle planter, create holes in the bottom for drainage.
4: Secure the Bottle Hold the plastic bottle securely in place. If needed, place it on a stable surface to prevent it from rolling or moving during the hole-puncturing process.
5: Position the Nail Position the nail on the predetermined spot where you want to create a hole. Hold the nail perpendicular to the surface of the bottle for a clean and efficient puncture.
6: Puncture the Bottle With the nail in position, use the hammer to gently tap the nail through the plastic bottle. Apply consistent pressure to ensure a clean puncture. Repeat this process for each hole you need.
7: Check the Holes Inspect the bottle to ensure that the holes are of the desired size and are located in the right positions. Adjust as needed by creating additional holes or modifying existing ones.
8: Clean Up (if necessary) If there are any plastic burrs or rough edges around the holes, you can use a knife or sandpaper to smooth them out. This step is particularly important if you’re repurposing the bottle for planting to avoid damaging the roots.
Procedure 2: Place the plastic bottle into the soil.
Placing the plastic bottle into the soil is the concluding step of many creative projects, especially those involving plant care or gardening. This step involves embedding the prepared plastic bottle into the soil, ensuring it sits securely and functions as intended. Here’s a simple guide on how to place the plastic bottle into the soil:
Materials Needed:
- Plastic water bottle (with holes, based on the project)
- Prepared soil
- Plant or seeds (if applicable)
Step-by-Step Process:
1: Prepare the Plastic Bottle Ensure that the plastic bottle has been appropriately prepared according to your project. This might include puncturing holes for controlled watering, creating a self-watering planter, or other specific functionalities.
2: Choose the Planting Location Select the spot in your garden, potted plant, or designated area where you want to place the plastic bottle. Consider factors like sunlight, spacing, and the specific needs of the plants you’ll be caring for.
3: Dig a Hole Using a garden trowel or your hands, dig a hole in the soil at the chosen location. The hole should be deep enough to accommodate the length of the plastic bottle, ensuring stability once it’s inserted.
4: Insert the Plastic Bottle Carefully place the prepared plastic bottle into the hole you’ve dug. Ensure that it sits securely in the soil, with the top part, where the openings or cap are, positioned above the soil surface.
5: Adjust the Depth Depending on your project, you may need to adjust the depth at which the plastic bottle is placed. For example:
- If creating a self-watering planter, make sure the bottom of the bottle is below the soil surface to allow for water absorption.
- For a watering system, ensure the holes are at the desired depth to release water where needed.
6: Surround with Soil Fill the hole around the plastic bottle with soil, securing it in place. Pat down the soil gently to eliminate air pockets and provide stability.
7: Plant (if applicable) If your project involves planting seeds or adding a specific plant, do so around the plastic bottle. Ensure that the plant’s roots have enough space to grow and access water if it’s a self-watering system.
8: Water the Soil Give the planted area a thorough watering to settle the soil and initiate the watering process if your project involves a water distribution system.
These techniques are not only effective but also demonstrate a sustainable approach to plant care. Whether you have a collection of glass bottles, a bathtub, or plastic bags, there’s a solution for every plant and every plant parent. Master the art of nurturing house plants in water with expert tips. Experiment with this technique of growing house plants in water, discover expert tips, and find what works best for your plants. Embark on your travels worry-free, knowing your green companions are well taken care of Happy gardening!


